


Circular Peyote Bezel & Ladder Stitch Tutorial
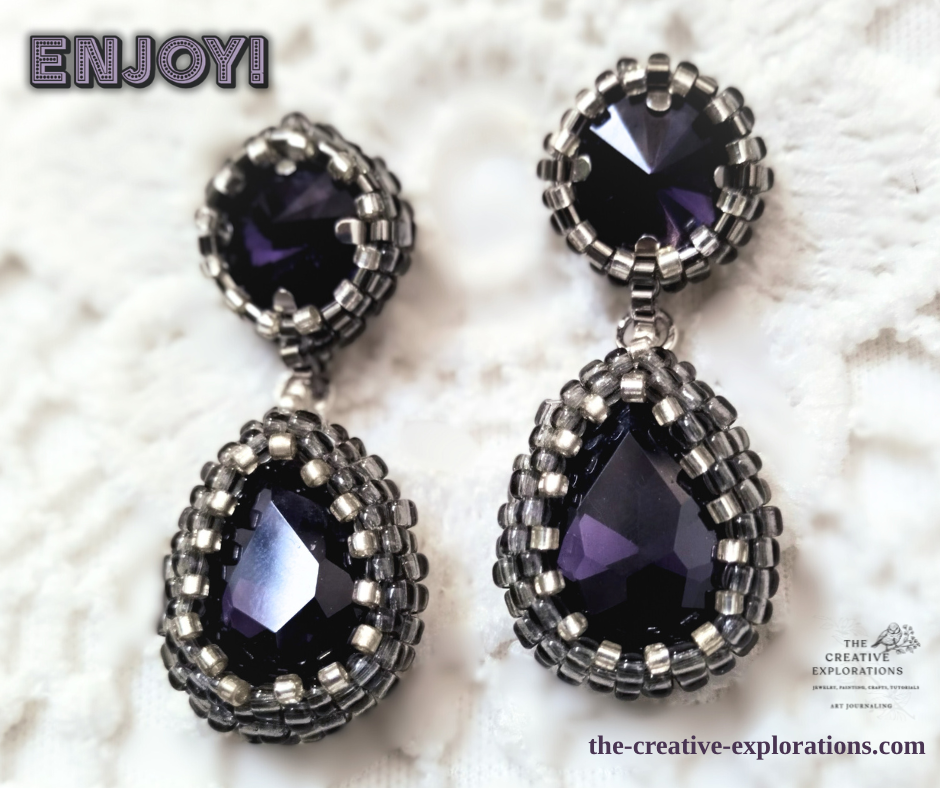
These bead-woven earrings are created using sew-on crystals (also known as rose monteés) and two sizes of seed beads: 11/0 and 15/0. It’s remarkable how simple the construction is, yet the result carries a timeless elegance.
The design can easily be adapted to suit different outfits and colour palettes, making it a piece you’ll want to recreate again and again. By simply changing the crystal shade or bead finishes, the overall character of the earrings transforms — from bold evening statement to delicate everyday sparkle.
In this pair, the deep amethyst tone of the crystals is beautifully complemented by the soft transparency of the 11/0 glass seed beads. At the same time, two shades of 15/0 seed beads introduce subtle contrast — balancing light and dark silver reflections for added depth and refined shimmer.
The combination of circular peyote stitch and carefully chosen bead finishes creates a structured yet luminous bezel that frames the crystal securely while enhancing its brilliance.

About Sew-On Crystals & Seed Beads
Sew-on crystals (often referred to as rose monteés) are faceted stones designed with small holes at the back, allowing them to be stitched securely into beadwork. Unlike flat-back crystals that require glue, sew-on crystals become fully integrated into the structure of the design. This makes them ideal for bead weaving projects, as the crystal is not only decorative but also structurally supported by the surrounding beads.
Glass seed beads — especially in sizes 11/0 and 15/0 — provide the framework that shapes and embraces the crystal. The larger 11/0 beads create the base and structure of the bezel, while the finer 15/0 beads help tighten, refine, and contour the edges. Their uniform size and subtle finishes allow for beautiful light reflection and precise shaping when working in peyote stitch.
Thread & Needles
For this project, I prefer using transparent fishing line due to its durability and invisibility. Because it is clear, it never shows between stitches or beads, maintaining a clean and professional finish. Its strength also allows the beadwork to remain secure over time without fraying.
Choosing a fine 0.2 mm nylon thread ensures that you can pass through the beadwork multiple times — which is essential when reinforcing the structure and shaping the bezel evenly. The ability to weave back through your stitches strengthens the piece and helps achieve a snug fit around the crystal.
This process is supported by using size 10 or size 12 beading needles. In beading, the larger the needle size number, the thinner the needle. Thinner needles allow you to pass through your bead multiple times without damaging the thread or distorting the beadwork.
Together, the right materials — sew-on crystals, nice, matching colours of glass seed beads, fine nylon thread, and appropriately sized needles — create a balance between elegance, durability, and precision.

Foundation Row: Building the 24-Bead Base Around a 10mm Sew-On Crystal
The 10mm sew-on crystal used in this design has 8 holes on the backside. These holes will serve as anchor points for our foundation row.
Step 1 – First Foundation Pass
We begin by picking up three 11/0 seed beads at a time, passing the needle through one hole of the crystal.
Repeat this around the crystal, adding three beads in each hole.
Step 2 – Reinforce the Foundation
Before continuing, weave through the newly added beads and the crystal holes at least twice.
This reinforcement step is important:
- It stabilizes the bead foundation
- It aligns the beads evenly around the crystal
- It prepares the structure for peyote stitch
Take your time here. A secure foundation determines the stability of the final bezel.
Step 3 – Completing the 24-Bead Circle
Now, between each existing group of three beads, add three new 11/0 beads in the spaces around the crystal.
By the time you finish this round, you will have a balanced circle of 24 beads, evenly distributed around the crystal.
This creates the base for even-count circular peyote stitch.
At this point, your foundation ring should sit flat and centered, forming a symmetrical 24-bead circle.
Why 24 Beads?
Using an even number such as 24 is essential for even-count circular peyote. It allows the stitch pattern to alternate correctly as you begin picking up one bead, skipping one, and stepping up at the end of each round.
Let’s go through the peyote stitch step by step.

Beginning Round 1 of Circular Peyote
(Pick 1, Skip 1)
With your thread exiting from any bead in the 24-bead foundation ring, we begin the first peyote round.
Step 1 – Pick Up 1 Bead
Pick up one 11/0 seed bead.
Step 2 – Skip 1 Bead
Skip the next bead in the foundation ring.
Step 3 – Stitch Through the Following Bead
Pass your needle through the next bead after the skipped one.
Pull thread snugly.
The new bead will sit slightly raised above the skipped bead.
Continue this sequence around the entire circle:
Pick 1 → Skip 1 → Stitch into the next bead.
Because we started with 24 beads:
(24 ÷ 2 = 12 beads added in Round 1)
At this stage, you will see alternating “high” and “low” beads forming.
The newly added beads are called up beads — these will receive stitches in the next round.
Step-Up Process (End of Round 1)
When you reach the end of the round:
You will be exiting from the last foundation bead you stitched into.
To prepare for Round 2:
- Pass your needle through the last bead you added in this round
- Then pass through the first bead added in Round 1
This positions your thread at the top of an “up bead.”
This movement is called the step-up, and it ensures that your rounds stack evenly instead of spiraling.
Round 2 of Circular Peyote
Now we continue the peyote rhythm.
This time, you will stitch only into the raised beads from Round 1.
Step 1 – Pick Up 1 Bead
Pick up one 11/0 seed bead.
Step 2 – Stitch into the Next “Up Bead”
Insert your needle through the next raised bead (added in Round 1).
Pull snugly.
Repeat this around the circle.
You will again add 12 beads in Round 2.
The structure will begin tightening slightly around the crystal.
End of Round 2 – Step Up Again
At the end of Round 2:
Pass through:
• The last bead you added
• Then the first bead added in Round 2
You are now ready to continue building height.
Tightening the Bezel
We now begin shaping and securing the crystal more firmly inside the bezel.
For the next rows, we switch to smaller 15/0 seed beads. This change in size is essential.
Why use smaller beads?
The 15/0 beads naturally sit slightly inward due to their smaller diameter. When stitched in peyote after 11/o rows, they create a gentle inward curve that:
• Tightens the bezel around the crystal
• Enhances the shaping of the edges
• Secures the sew-on crystal in place
• Creates a refined, delicate finish
Round 3 (15/0 Peyote)
Continue working in circular peyote stitch:
Pick up 1 size 15/0 seed bead
Skip 1 bead from the previous round
Pass through the next bead
Repeat this pattern all the way around.
Because the beads are smaller, you will begin to notice the beadwork naturally drawing inward toward the crystal. Make sure to keep your tension even and snug — this is what gives the bezel its clean, sculpted form.
At the end of the round, complete the step-up by passing through the last bead of the previous round and the first bead of the current round.
Round 4 (Final Tightening Row)
Work one more round in peyote stitch using 15/0 beads. I used two different colours of 15/0 beads in this design, a darker and a lighter sparkly silver.
This second row of smaller beads further tightens the bezel and locks the crystal securely into place.
It is very important during this stage to:
• Stitch snugly toward the edge each time you add a bead
• Maintain consistent thread tension
• Weave through your beadwork at least twice after finishing the round.
Reinforcing by weaving through the beads again helps:
You will see the beadwork gently cup around the stone, holding it firmly without the need for glue.
At this point, the round bezel is formed, structured, and secured — ready to become the foundation for the rest of the earring design.

Ladder Stitch – Creating the Connector
To prepare the round bezel for assembly, we create a small connector using ladder stitch.
Ladder stitch is worked by picking up a bead and passing the needle back through the previous bead, aligning them side by side. Each new bead is secured by stitching back through the bead just added, forming a straight, structured column of beads. The result is a stable yet flexible strip of beadwork.
In this design, the ladder stitch is worked centered along one side of the round bezel. Rather than building it at the top, we position it precisely along the edge so that it forms a small beaded loop — a discreet ring-connector.
This beaded connector will later allow us to:
• Attach the teardrop bezel with a small jump ring (Part 2)
• Ensure proper alignment and balance
Because ladder stitch creates a firm linear structure, it holds its shape well while still allowing slight movement — ideal for earrings that need flexibility without losing stability.
When forming the connector, keep your tension even and weave through the beads multiple times more to reinforce the strip. This prevents twisting and ensures the connector sits straight against the bezel.
This small structural detail plays an important role in the final assembly and overall elegance of the earrings.
Part 1 Complete – Round Bezel Finished
With the round rose montee securely framed in its peyote bezel and the ladder stitch connector in place, the first element of the earrings is now complete.
The structure is reinforced, the crystal is firmly seated, and the foundation for assembly has been prepared. The combination of 11/0 and 15/0 seed beads creates both stability and refinement — shaping the bezel while enhancing the brilliance of the stone.
In Part 2, we will:
• Create the teardrop crystal bezel
• Adjust the peyote structure for shaping
• Connect both components
• Assemble and finish the earrings
Together, these elements will form the complete bead-woven earring design.
Part 2 Preview video:
You’re also warmly invited to:
✨ Subscribe to the blog newsletter for detailed tutorials and creative updates
✨ Follow The Creative Explorations on Facebook for new posts and behind-the-scenes content
✨ Visit YouTube for process videos and stitch demonstrations
Thank you for joining this creative journey.
More bead weaving explorations are on the way!
-The Creative Explorations


Leave a Reply